There is very little guidance on how to organize front-end applications in the world of React. (Just move files around until it “feels right,” lol). The truth is that we can do better. Let’s take a look at one pattern you might consider using to architect your site.
At first, you might split up your code between /components and /containers folders. This works for small sites but you’ll find yourself look for something more robust when scaling to larger sites. Luckily, decades of research into systems design has given us a wealth of patterns to explore to create a scalable architecture.
One of those is domain-driven design, and it has regained popularity over the last few years. Let’s explore how we can use it in React-land.
A primer on domain-driven design
Domain-driven design (DDD) is the practice of managing complexity of software applications by relating their underlying data models to domain logic. That’s a mouthful, so let’s break it down further.
The domain is an ontology, meaning how things are grouped in the world. For example, the word joist has a very specific connection to the domain of building construction. Another word, like Mike, can belong to multiple domains, such as the domain of Biblical names (short for Michael), or in the domain of politics as it relates to the NATO phonetic alphabet.
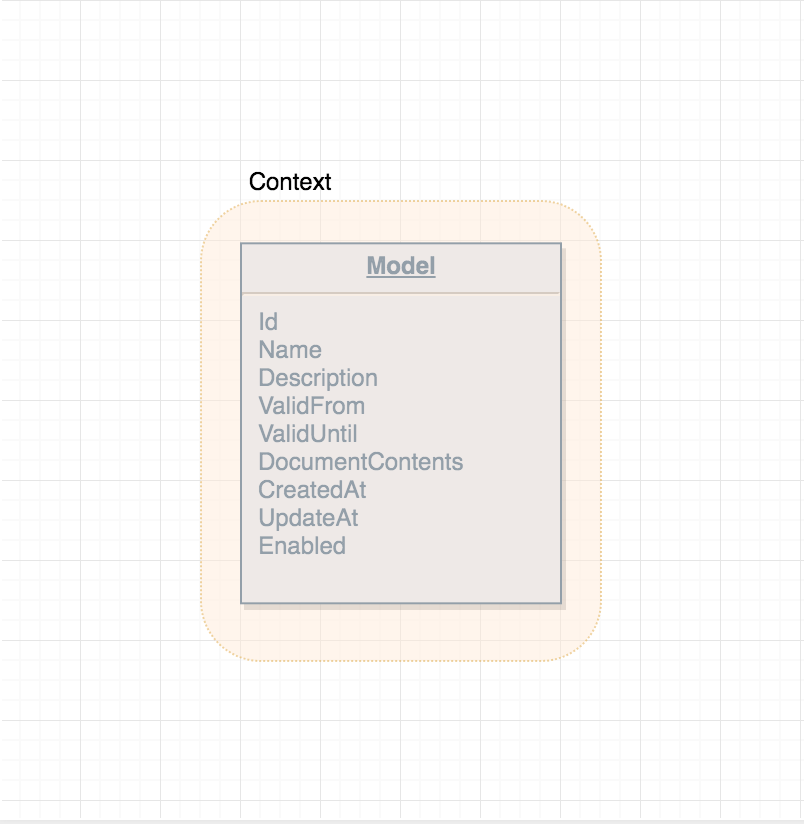
When the design is domain-driven, it means we place the model of our domain (e.g. a playing card in the domain of Poker) in a context (e.g. the contextual grouping, such as a Game) to help manage the complexity.
Organizing a DDD site
Domain-driven design is specifically for handling the complexity of growing sites as they add more and more models. It doesn’t really make sense for a site with one model. Once you get to about four models, that’s a good time to start looking at binding your models to multiple contexts. This isn’t a hard-and-fast rule, so don’t feel like you have to break out into multiple contexts, but once you get above four models, those contextual groupings will begin to surface.
Start by organizing your domains
Let’s use Twitter as our example site to organize. One way to separate domains within Twitter is to split up our models between the Blog platform that powers the Tweets and the Interaction elements that enable the micro-blogging to spread and flourish.

Is this the only way to separate concerns in Twitter? Definitely not! One key aspect of DDD is that there is no one correct way to create domains. There are plenty of ways to split up the bounded contexts of an application, so don’t focus too much on the architecture we’ve chosen. Instead, use this as a springboard to understand how we can apply DDD to the organization of our front-end code.
That said, our code will now be structured to look like this (assuming you start with something like create-react-app):
twitter/
├── App.css
├── App.js
├── App.test.js
├── blog/
└── interaction/
Define the components and containers in each domain
Now that we have our basic folder structure set up, it is time to add some real components! Looking at our domain UML diagram above, it would be useful to start with containers that fetch data on a given page and components that organize the templates that compose those pages. Expanding on our app, we now have the following structure in place (omitting our accompanying test.js files for simplicity):
twitter/
├── App.css
├── App.js
├── App.test.js
├── blog/
│   ├── HomePage.js
│   ├── TweetCard.js
│   ├── TweetDialog.js
│   ├── TweetList.js
│   ├── TweetListItem.js
│   ├── UserPage.js
│   └── UserCard.js
└── interaction/
    ├── FollowButton.js
    ├── LikeButton.js
    └── ShareButton.js
We still keep our App file to initialize React to our root-level HTML tag. With our domains in place, we begin to build our containers (such as HomePage and UserPage) and components (such as TweetCard and TweetListItem). Alternatively, we could further segment the models within our domains to look like so:
twitter/
└── blog/
    ├── user/
    │   ├── HomePage.js
    │   ├── UserCard.js
    │   └── UserPage.js
    └── tweet/
        ├── TweetCard.js
        ├── TweetDialog.js
        ├── TweetList.js
        └── TweetListItem.js
But given the size of the application it isn’t necessary at this stage.
Add helpers, if they’re needed
As we build out our application our UIs will continue to increase in complexity. To deal with this, we have two methods for separating concerns and pulling logic out of our component templates: presenters and utilities. Presenters push all of the visual presentation logic out of the templates to keep the view layer as clean and simple as possible. Utilities collect shared functionality for all other logic on the front end that is not specifically related to the templates. Let’s examine these a bit closer.
Clean up templates with presenters
Think of a Twitter profile. What kinds of elements do you see here on my account?

There’s information directly related to my user: name, handle, description, location, website, birthday, start date. There are also counts of associations between other models — how many other users are following me? How many other users am I following? There’s additional logic that isn’t even captured on the page, such as my tweets, replies, media uploads, and content I’ve liked. To capture all of this presentational logic appropriately, we can add an additional file within our file tree to isolate our presenter pattern from the JSX component:
twitter/
└── blog/
    ├── user/
    │   ├── UserCard.js
    │   ├── UserCard.presenter.js
Push out logic into utilities
Certain presentational logic is so fundamental that it could be useful across applications regardless of whether or not it is used within rendering. Currency formatting, validations, and timestamp formatting are all use cases where we could benefit from isolated utility functions across our application. Where do those live? Since they span domains, utilities can be in their own folder:
    twitter/
    ├── App.css
    ├── App.js
    ├── App.test.js
    ├── blog/
    │   ├── HomePage.js
    │   ├── TweetCard.js
    │   ├── TweetDialog.js
    │   ├── TweetList.js
    │   ├── TweetListItem.js
    │   ├── UserCard.js
    │   ├── UserCard.presenterjs
    │   └── UserPage.js
    ├── interaction/
    │   ├── FollowButton.js
    │   ├── LikeButton.js
    │   └── ShareButton.js
    └── utils/
         ├── currency.js
         ├── time.js
         └── validation.js
There is no wrong way to organize your app!
Ultimately, the choice is yours. This is just one example for myriad ways you could arrange your application. Domain-driven design is a valuable tool because it separates business logic in a meaningful way, creates a clearer distinction for domain expertise amongst developers, and provides rules for easily organizing and scaling your code.
But if you’re looking for an alternative to the traditional chaos of React application file structures, take a look at domain-driven design. It may be just the thing.
Lastly, if you like this sort of content and want to learn more about front-end, user interface development, and UX design and research (organized by your experience in the industry), I run a free newsletter that you might want to check out.

I would love to see DDD applied in the context of a more complex application. Our team uses DDD on the backend-side, so I think there is value in using the same model to organize code in the front- and backend.
Thanks for the interesting article, Adam. Can you recommend any open source projects that use this style of organization? I’d love to dive more deeply into this.
Shouldn’t this called more context-driven design since context here is what is grouping data models of different domains?
Although interesting I think this article is really far away from what DDD is supposed to be.